Use Automatic Captions Across Different Video Platforms

Automatic speech recognition (ASR) captions can be a crucial starting point for improving the accessibility of your video content; especially if you lack the budget to outsource it to vendors, or the time/resources to manually transcribe every word of your (extensive) back catalog. I say “starting point” because even the best ASR technologies are only about 75% to 85% accurate. So it’s up to you to manually correct captions to get them as close to error-free as possible, as recommended by DCMP.

It wasn’t all that long ago when ASR captions seemed like a rare and coveted feature of many video platforms, sometimes available at a premium, but generally scarce. As the most popular video platform, YouTube has applied ASR captions to content for years.  In fact, my previous captioning strategy was 1) upload videos to YouTube, 2) edit the ASR captions, 3) export the edited caption file, and 4) import the caption file into another video platform.

While many additional video platforms now include ASR captions as a standard service, some popular ones like Vimeo still lack this important feature. In cases like these, I still recommend YouTube as a readily available source for generating ASR captions and exporting edited files. Admittedly, it’s been a while since I’ve personally relied on this strategy. In the past couple of years it seems there have been a few changes, the biggest of which is that the exported caption file is only available from YouTube in .sbv format. In the past, you could choose from a variety of widely used formats like .srt and .vtt, but more on this later in the post. I re-familiarized myself with this process, so I’m sharing what I found here.

Edit and Download Captions from YouTube

If you don’t already have one, follow YouTube’s instructions to upload a video. I recommend setting it to unlisted or private, at least until you’ve got everything edited. Also, you will probably have to wait 5 to 10 minutes before the automatic captions become available to edit.

  1. Start by going to your YouTube Studio dashboard, then click on the “Subtitle” link in the left-hand navigation menu.
    .
  2. On the Channel Subtitles page, click on the video you’d like to edit.
    .
  3. On the Video Subtitles page, in the automatic caption row, click the button text labeled “DUPLICATE AND EDIT.”
    .
  4. In the open caption editor dialogue, click the button text labeled “EDIT TIMINGS.” Now play through your video and inspect the text containers to the left of the video player, making edits when needed.
    .
  5. Periodically click the “Save Draft” button near the top right corner of the editor dialogue until you are finished.
    .
  6. To export the edited caption file, click the “Options” ellipses (…) just to the right of the “EDIT AS TEXT” button, and just above the frame timing box and select “Download subtitles” from the listbox. The captions.sbv file will automatically download to your computer.

Convert Captions to .srt or .vtt Formats

Unlike YouTube, other video platforms like Vimeo and Kaltura use caption formats like .srt or .vtt. Converting caption files is easy with the Free Caption Format Converter Tool from 3Play Media, one of the most trusted captioning vendors in the market.

  1. Go to the 3Play Caption Format Converter.
    .
  2. Open the captions.sbv file you exported from YouTube in a plain text editor like Notepad or TextEdit.
    .
  3. Next, copy all of the text in the captions.sbv file.
    • Windows: Ctrl + A to select all, then Ctrl + C to copy.
    • Mac: command + A to select all, then command + C to copy.
      .
  4. Paste the copied text into the text box labeled “Paste Your SRT/SBV File.”
    • Windows: Ctrl + P to paste.
    • Mac: command + P to copy.
      .
  5. Select SRT or WebVTT as the Output Format, then click the “CONVERT MY FILE” button. The file will download to your computer.

Import the Converted Caption File to Vimeo

If you don’t already have one, follow Vimeo’s instructions to upload a video. I recommend setting it to private, at least until you’ve got everything edited.

  1. Start by going to your Vimeo Video Manager.
    .
  2. Click the video to which you’d like to add captions.
    .
  3. On the following video page, click the “Advanced” button in the right-hand sidebar.
    .
  4. On the video settings page, click the “Distribution” link in the left-hand navigation menu, then click the “Subtitles” link.
    .
  5. In the “Captions and Subtitles” heading, near the “My Uploads” heading, click the  “New File” + button.
    .
  6. In the open menu, choose the language of your captions, then choose “Captions” in the “Type” field, then click the “Choose file” button.
    .
  7. Select the converted .srt or .vtt file from the files on your computer, then when the upload is complete, click to toggle the captions ON and click the “Save” button.
    .
  8. Return to your Vimeo video manger and click the video to view it in a video player. You should now see a CC button, which you can click to turn captions on.



New Accessibility Workshops Just in Time for Fall ’21

As we inch closer to the start of the fall ’21 semester, you’ve probably got a mile-long checklist of things to prepare. But before you update that web page, or publish that PDF document, or launch that form, or build that online course, have you thought about accessibility?

Learning Environments has got you covered with a new round of workshops that includes topics on accessible design essentials, PDFs, Microsoft Word and PowerPoint, video captions, and Universal Design for Learning (UDL). Check out the schedule and sign up using the registration links below.

For a full list of all of the upcoming Learning Environments workshops, check out the Digital Teaching and Learning Workshop Calendar.

Fall ’21 Kick-off Workshop Schedule

Basic Accessibility Design Principles

Description:
Learning a handful of simple accessible design principles can have a huge impact on a wide range of the digital content you create and share, including web pages, PDFs, Word documents, presentations, videos, social media, communications, and more. In this one-hour presentation-based workshop, learn what these principles are and how you can start weaving them in your own digital design practices. Choose any one of the following three sessions:

Accessible PowerPoint Essentials

Description:
This session is designed to give you an overview of accessibility best practices in PowerPoint. We will discuss slide layouts, reading order, slide titles, alternative text, font sizes, and more.

Video Caption Essentials

Description:
This session is designed to give you an overview of options for live (synchronous) and recorded (asynchronous) closed captions using Zoom and Kaltura, as well as other applications like PowerPoint 365 and Google Slides. Choose any one of the following three sessions:

Accessibility in Canvas

Description:
Learn about the basics of accessibility in Canvas so that all students can access your course. Choose any one of the following three sessions:

PDF and Acrobat Accessibility Essentials

Description:
This session is designed to give you an overview of accessibility tools in Adobe Acrobat Pro/DC. We will discuss essential tools like the Tags and Content panels, as well as the Accessibility checker and Alternative Text wizard.

Accessible Microsoft Word Essentials

Description:
Microsoft Word is available to all Rice students and employees. It is a gold standard application for all word processing needs. In this session, we will discuss several of the basic techniques for designing Word documents that are accessible for everyone. Using Word also makes it easy to export PDFs that meet most accessibility needs.

Universal Design in Online and Blended Courses

Description:
In this interactive workshop, you are encouraged to bring your own online course design ideas for live discussion. This includes Canvas content, quizzes, navigation and organization, accessible documents, alternative formats, groups and collaboration, discussions, Kaltura and using video effectively, Zoom, breakout rooms, polling, anything else you’d like to discuss. John Williams will facilitate the discussion using a demo course.


Big Accessibility Fixes Applied to rice.edu!

I know I haven’t updated all summer, but I promise it’s not because I’ve been slacking off. Okay, there was that one week when I went to the mountains, but other than that, it’s been full steam ahead.

I’ve got some exciting news to share! We’ve been hard at work making major accessibility upgrades to the rice.edu domain to ensure that our public website meets the standards set by the Digital Information Accessibility policy (851).

I wanted to use this post to highlight these important changes and discuss how they help Rice better align to the WCAG 2.1 A-AA criteria. Most noteworthy are the improvements to keyboard operability and assistive technology support. I hope these examples give you a better idea about how these standards are applied and why they matter. Ultimately, I hope this helps you create and share more accessible web content.

Note: These changes are released to the main rice.edu environment, but some pages within the larger Rice University website may still lack some or all of these features. For example, your department could have used a third party vendor to help create your site with modified styles and JavaScript. I would challenge you to take a look at your own site check if any of these important features are missing. If you identify any deficiencies, please report them to access@rice.edu so the Accessibility Steering Committee can address them ASAP.

Skip Navigation Link

Skip to main content link
What is it? When keyboard-only users navigate webpages, they use the TAB and arrow keys to move to the next interactive item like hyperlinks, form fields, buttons, etc. Most websites have blocks of content like navigation menus which are repeated at the top of each page. Therefore, the first TAB press should focus on a link that allows keyboard-only users to skip over these repeated blocks and jump straight to the main content region of the page.

How to test: Press the TAB key to move forward, and Shift + TAB to move backward. The first TAB press at the top of the page should focus on the “Skip to main content” link. Press ENTER or SPACE to activate the link.

Learn more about relevant WCAG criteria: 2.4.1 Bypass Blocks (Level A); 2.1.1 Keyboard (Level A); 1.3.2 Meaningful Sequence (Level A); 1.3.1 Info and Relationships (Level A)

Keyboard Operable Hamburger Navigation

Fully expanded hamburger navigation with submenu item receiving keyboard focus.

What is it? As mentioned above, keyboard-only users press TAB and arrow keys to navigate and ENTER and SPACE to activate links and buttons. All interactive items on webpages must be fully keyboard operable for anyone who cannot use a mouse. Moreover, keyboard operability must make logical sense. Previously, the main hamburger navigation on the Rice website had a several issues that, when combined with the lack of a skip nav link, created real accessibility barriers for blind and low-vision users. We are proud to say that the hamburger navigation, as well as the “share on social media” button and site search, are now fully keyboard operable and include information about their expanded/collapsed state for screen reader users.

How to test: Press TAB to move keyboard focus to the hamburger navigation icon, then press ENTER or SPACE to expand the menu. Press TAB to move forward and SHIFT + TAB to move backward. Press ENTER or SPACE to expand any submenus. Press ESC to close the menu without making a selection.

Learn more about relevant WCAG criteria: 2.1.1 Keyboard (Level A); 1.3.2 Meaningful Sequence (Level A); 1.3.1 Info and Relationships (Level A)

Visible Focus Indicators

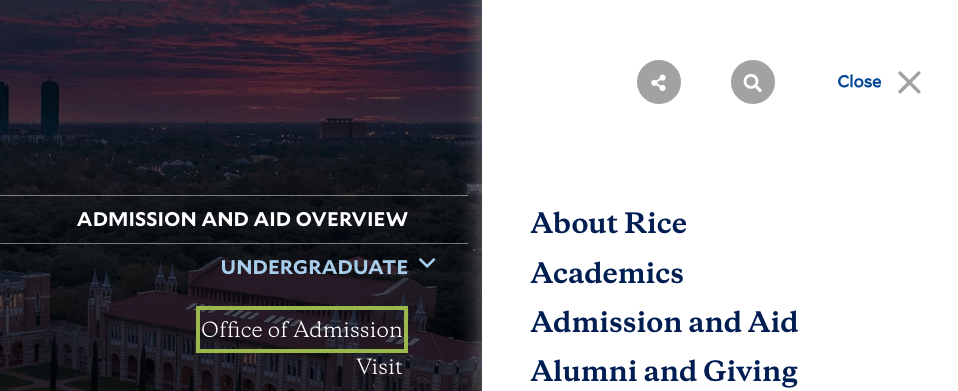
Menu item with box-style focus indicator around the item receiving keyboard focus.

What is it? For users who have low vision and/or certain cognitive disabilities, all interactive items that are keyboard operable should include visible focus indicators. That means there is an apparent frame or other way of highlighting the item in focus when pressing TAB or arrow keys to navigate to interactive items. Prior to the rice.edu upgrades, not only were all interactive elements not accessible with a keyboard, but some that were keyboard accessible did not include visible focus. We are proud to say that all items are now fully keyboard operable and include visible focus.

Note: Some items like images/graphics are not typically keyboard focusable unless they are also hyperlinks. Likewise, headings and body text aren’t included by default in the TAB order, just interactive elements like links. However, web designers can add elements to the tab order using the tabindex attribute, but that should be used very intentionally.

How to test: Use TAB and arrow keys to move to interactive items and observe if it includes a visible focus indicator.

Learn more about relevant WCAG criteria: 2.4.7 Focus Visible (Level AA); 2.1.1 Keyboard (Level A); 1.3.2 Meaningful Sequence (Level A); 1.3.1 Info and Relationships (Level A


May 2021 Workshop Rewind

Well, it’s somehow already Memorial Day weekend, which means it’s pretty much June! We will roll out a whole new schedule of workshops and training sessions soon, so stay tuned.

As for May, we hosted some awesome virtual sessions, which resulted in two new recordings, so it was a great success. Check out the links below to view the edited recordings as well as the workshop outlines/agendas.

One thing that’s been on my to-do list is to create a new section of the Access @ Rice website where you can find archived workshop recordings and workshop handouts. Until then, you can view our previously recorded workshops here.

Please contact me at a11y@rice.edu if you have any questions or comments, and let me know if there are any workshop topics you’d like me to tackle in the future. Also, if you ever encounter accessibility barriers with any of Rice University’s digital information, please contact the accessibility steering committee at access@rice.edu and we’ll get back to you ASAP.

May 2021 Accessibility Workshops

It’s been a little while since my last update here. The good news is that a lot of exciting updates have been taking place behind the scenes in that time, including some improvements to the rice.edu website. More on that in a future post.

There are some exciting accessibility learning opportunities lined up for the month of May, including an interactive workshop on Global Accessibility Awareness Day (GAAD).

There are multiple repeated sessions covering the basic principles of accessible design, so take your pick. There are also sessions on favorite topics like Adobe Acrobat, PDF forms, Microsfoft Word and PowerPoint, and video captions. You’ve also been asking us to add workshops on Adobe Indesign. We listened and we’ve scheduled two!

Check out the full schedule below. Register for each session by clicking the link title.

Date Title/Registration Link Description
Wed. 5/05 Basic Accessible Design Principles Learn the basic principles and how to apply them to your own digital designs.
Thu. 5/06 Microsoft Word Accessibility Essentials Learn how to apply the basic design principles to your Word Documents.
Fri. 5/07 Acrobat & PDF Accessibility Essentials Learn the basics of creating, cleaning up, and remediating accessible PDFs in Adobe Acrobat.
Mon. 5/10 Basic Accessible Design Principles Learn the basic principles and how to apply them to your own digital designs.
Wed. 5/12 InDesign Accessibility Essentials Learn how to apply basic accessible design principles to your InDesign layouts and export options for best result to PDF.
Thu. 5/13 Accessible PDF Forms Learn to design fillable forms for PDF format with emphasis on tags, form field labels, descriptions, and tab order.
Fri. 5/14 Microsoft PowerPoint Accessibility Essentials We will discuss slide layouts, reading order, slide titles, alternative text, font sizes, and more.
Mon. 5/17 Basic Accessible Design Principles Learn the basic principles and how to apply them to your own digital designs.
Tue. 5/18 InDesign Accessibility Essentials Learn how to apply basic accessible design principles to your InDesign layouts and export options for best result to PDF.
Thu. 5/20 Fix Your Web Content with the Pros (GAAD 2021) Learn how to scan your webpages and documents, identify issues, and remove common accessibility barriers. Think of it like a guided hackathon to improve access for all.
Mon. 5/24 Basic Accessible Design Principles Learn the basic principles and how to apply them to your own digital designs.
Wed. 5/26 Better Captions for Everyone An overview of options for live (synchronous) and recorded (asynchronous) closed captions including Zoom, Kaltura, and other options.

February Workshop Rewind

It’s hard to believe it’s already March! In a couple of weeks, it’ll be time for spring break and daylight savings. Before you know it, we’ll all be vaccinated and back on campus, holding workshops together in person.

There’s a lot to look forward to, but I wanted to take a minute to reflect on the excellent digital accessibility workshops we hosted in February and share links to several of the recordings.

Check out the following links to view the edited recordings with accurate closed captions.

I’ll update this post with more February workshop recordings and additional resources soon. Stay tuned!


12 Accessibility Workshops for February

It’s hard to believe we’re one full month into 2021. How would you qualify that sentence, “only one full month in,” or “already one full month in?” Sometimes, it feels like both.

February may be the shortest month, but we’ve packed it with a really versatile workshop schedule, including sessions on the brand new live caption feature is Zoom. Read more about Zoom live captions.

Each week in February has a kind of theme where most of the Monday and Wednesday sessions are informational and the Friday sessions are hands-on workshops. Week one is an exception though. None of the workshops have any prerequisites, so feel free to sign up for any and all of them.

Take a look at the schedule below and use the links to sign up.

NOTE: All workshops start at 10:00 am and last for one hour.

Week One: Accessibility Essentials

Week Two: PDFs and Adobe Acrobat

Week Three: Online Courses and Canvas

Week Four: Accessible Document Design

Zoom Live Captions Are Here!

Just in time for the spring ’21 semester, Zoom has released live automatic speech recognition (ASR) captions for meetings and webinars! That means you no longer have to rely on workaround solutions like Google Slides or PowerPoint 365 as we previously recommended.

To start using live ASR captions in Zoom meetings and webinars, you’ll first need to go to the settings page of your Zoom account.

On the Settings page, select ‘In Meeting (Advanced)‘ in the menubar.

Find the setting labeled ‘Closed captioning‘ and make sure it’s toggled ON.

Next, select the checkbox labeled ‘Enable live transcription service to show transcript on the side panel in-meeting.’ Be sure to select the ‘Save‘ button after making the change.

Zoom live captions setting.

Note that any changes you make to your Zoom account won’t take effect until the next time you start a meeting or webinar. Any in-progress meetings need to be ended and restarted before the changes are available.

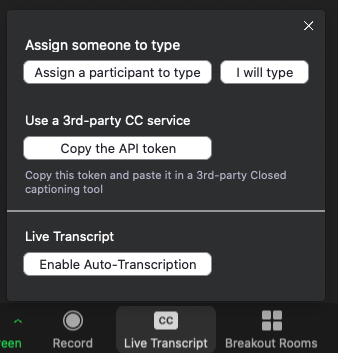
The next time you start a Zoom meeting or webinar you will see a button labeled ‘Live Transcript.’

Enable Auto-Transcription setting.

IMPORTANT: You must manually ‘Enable Auto-Transcription‘ each time you start a meeting to ensure that your meeting participants can use the closed captions.

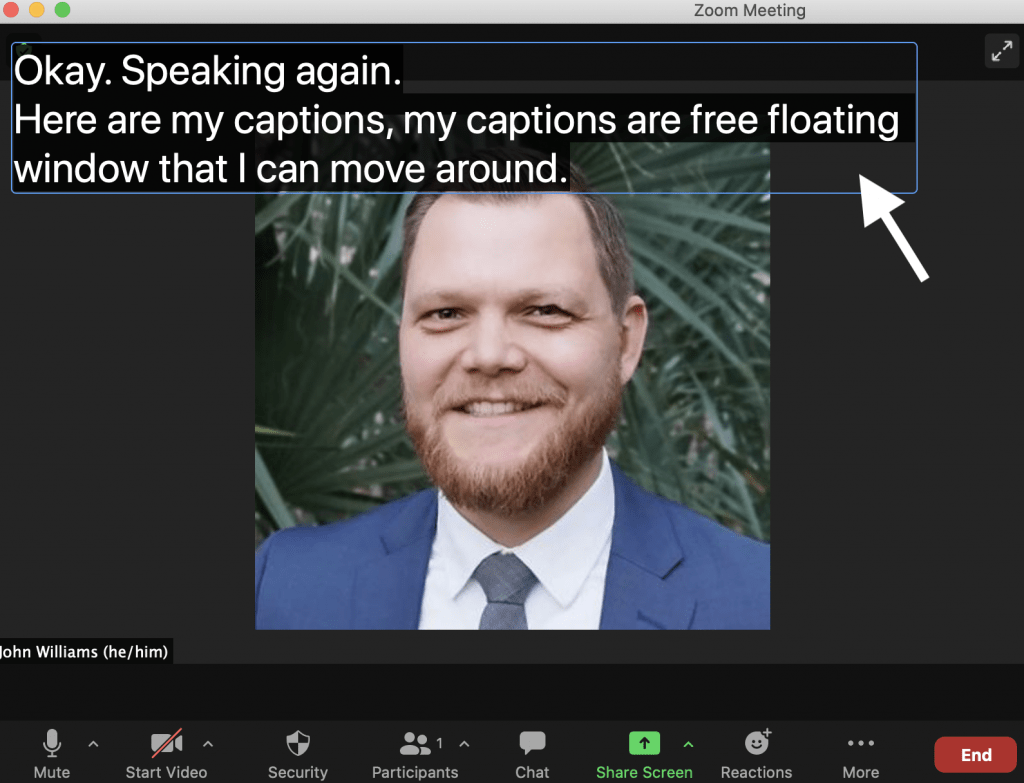
Once the host enables auto-transcription, each attendee can choose to show or hide the closed captions. Everyone can customize the size of caption text by selecting ‘Subtitle settings.’ Each attendee can also drag the caption box to reposition it anywhere in the meeting window.

Floating caption box is moveable.

Live captions are included in cloud recordings and are fully editable too. See our KB article about editing Zoom captions for more information.


Math Accessibility and UDL

Happy 2021, everybody! I hope your year is off to a great start so far.

Before the winter break started, I received several questions about making STEM content more accessible, particularly math equations.

This post will attempt to break down a few of the challenges and recommend a few solutions for providing your math equations in multiple formats that better suit the diverse needs of your audience.

Heads up, this is kind of a long one.

Challenges

LaTeX

The standard way to produce math equations is LaTeX. However, LaTeX by itself is not considered to be very accessible for people with visual disabilities.

Technically speaking, anyone regardless of dis/ability could go through lines of LaTeX syntax in the tex file to figure it out, but that is not typically how users read and comprehend math equations. Consider the increased demand this places on working memory for non-visual users: one would have to mentally transform the syntax into a representative equation while simultaneously attempting to work it out. You can probably understand how this isn’t the most equitable option.

PDF

LaTeX exported to PDF often looks great with beautifully rendered equations, but these files do not contain the appropriate semantic structures known as tags. Therefore, anyone using assistive technology like screen readers can’t access the content in a meaningful way.

I don’t want to take up the space here discussing all of the reasons why it’s not feasible to try and make your Math PDFs accessible. Suffice it to say, it would take a lot of expert knowledge of Adobe Acrobat and tags, and a lot of time to remediate everything.

A 40-page evaluation was recently published detailing how one might produce a tagged PDF with “minimal manual intervention.”


Recommended Solutions

As much as it pains me to admit it, not every single format of digital information can be made universally accessible (as illustrated in the LaTeX/PDF example above). Does this mean that math isn’t for people with visual disabilities? Absolutely not!

The solution lies in the framework of Universal Design for Learning which promotes multiple modes of representation, engagement, and action. “Multiple modes” is the operative phrase here.

Can you force LaTeX syntax or PDFs to be accessible? Not really, but you can provide your math content in at least one additional format. To be clear, we’re not saying “don’t use LaTeX or PDFs” for your math content. We’re simply suggesting that you provide at least one alternative format to give your students more choices. This is an example of what Dr. Tom Tobin calls “plus-one thinking.”

For example, if you normally administer an exam by providing your students with a printable PDF, then consider having an electronic version also available in Canvas. Every student could choose between the printed and electronic versions and disabled students would no longer require accommodations. Everybody wins!

MathML

MathML is widely considered to be a more accessible format for representing math equations. However, you may not be accustomed to working in MathML to create your equations. Pandoc is a “Swiss-Army knife” application for markup file conversion. Try converting your LaTeX markup to HTML4 or HTML5, then include the accessible valid markup on your course site.

Canvas

Equation Editor

Canvas LMS includes a WYSIWYG equation editor that makes it easy to build equations by clicking button icons. Alternatively, you can paste your LaTeX markup directly into the “advanced” editor. The LaTeX equations are perfectly rendered as vector graphics in Canvas. By default, the alternative text for these graphics is the LaTeX syntax, which as stated previously, presents accessibility challenges. Replace the LaTex alternative text description using more natural language that represents the equation. See this example from Penn State Accessibility.

MathJax

Currently, a limited number of Rice Canvas sub-accounts include MathJax, which makes creating equations in the Rich Content Editor even easier. For more information, see the Digital Teaching & Learning Blog and see our documentation on MathJax.

Other Options

Think of creative ways to use audio and/or video representations of your math content. These multimedia representations can be highly engaging alternatives for many students. Note that your multimedia should include appropriate captions and/or transcripts.

Process-Driven Math (PDM) is also a very promising method for representing complex math equations for students with an array of disabilities, including visual and cognitive disabilities. Check out Dr. Yvette Pearson’s podcast interview with AUM’s Ann Gulley to learn more about PDM and theLogan Project.


Questions?

If you have any questions or suggestions about creating accessible math equations, email us at a11y@rice.edu, or Tweet @RiceA11y.

December Workshops Added!

Hey y’all! I hope you had a safe and relaxing Thanksgiving holiday. December is shaping up to be a short but busy work month! I’ve crammed eight events into the next two weeks, which coincidentally fall during another eight day festival 🕎 (Happy Hanukkah!). I’m calling it the Festival of A11y, or Festiva11y 🎉 ♿. Okay, I might be stretching a little too hard for that portmanteau…

I’ve added a couple new workshops to the mix which are designed to be honest-to-goodness interactive discussion-based workshops. The two new sessions will focus on Drupal and STEM content respectively. We want to hear about your challenges and concerns, so please plan to attend with a list of questions.

We know it’s a crazy time with finals and winding down the year’s business, but we hope to see you at one (or all) of our sessions. Sign up below.

Workshops

Accessible Docs & PDFs

Description: Learn the best practices for making accessible Word documents and a workflow for converting them into accessible PDFs.

Dates:


Better Closed Captions

Description: This 1-hour workshop is designed to give you an overview of options for live (synchronous) and recorded (asynchronous) closed captions using Zoom, Google Meet, and Kaltura, as well as other applications like PowerPoint 365 and Google Slides.
Learn more about the best practices of using automatic speech recognition (ASR) captions and caption editing.

Dates:


Drupal 8 Accessibility, Successes & Challenges

Description: In this collaborative 1-hour discussion, share your challenges and questions about designing Drupal 8 content with greater accessibility in mind. The accessibility coordinator will help you troubleshoot and recommend solutions.

Dates:


Accessible STEM, Successes & Challenges

Description: In this 1-hour collaborative discussion share your challenges and questions about designing accessible digital STEM content. There is no magic bullet, but the Accessibility Coordinator will help you find solutions that work for you and your students.

Dates: