Use Automatic Captions Across Different Video Platforms

Automatic speech recognition (ASR) captions can be a crucial starting point for improving the accessibility of your video content; especially if you lack the budget to outsource it to vendors, or the time/resources to manually transcribe every word of your (extensive) back catalog. I say “starting point” because even the best ASR technologies are only about 75% to 85% accurate. So it’s up to you to manually correct captions to get them as close to error-free as possible, as recommended by DCMP.

It wasn’t all that long ago when ASR captions seemed like a rare and coveted feature of many video platforms, sometimes available at a premium, but generally scarce. As the most popular video platform, YouTube has applied ASR captions to content for years.ย  In fact, my previous captioning strategy was 1) upload videos to YouTube, 2) edit the ASR captions, 3) export the edited caption file, and 4) import the caption file into another video platform.

While many additional video platforms now include ASR captions as a standard service, some popular ones like Vimeo still lack this important feature. In cases like these, I still recommend YouTube as a readily available source for generating ASR captions and exporting edited files. Admittedly, it’s been a while since I’ve personally relied on this strategy. In the past couple of years it seems there have been a few changes, the biggest of which is that the exported caption file is only available from YouTube in .sbv format. In the past, you could choose from a variety of widely used formats like .srt and .vtt, but more on this later in the post. I re-familiarized myself with this process, so I’m sharing what I found here.

Edit and Download Captions from YouTube

If you don’t already have one, follow YouTube’s instructions to upload a video. I recommend setting it to unlisted or private, at least until you’ve got everything edited. Also, you will probably have to wait 5 to 10 minutes before the automatic captions become available to edit.

  1. Start by going to your YouTube Studio dashboard, then click on the “Subtitle” link in the left-hand navigation menu.
    .
  2. On the Channel Subtitles page, click on the video you’d like to edit.
    .
  3. On the Video Subtitles page, in the automatic caption row, click the button text labeled “DUPLICATE AND EDIT.”
    .
  4. In the open caption editor dialogue, click the button text labeled “EDIT TIMINGS.” Now play through your video and inspect the text containers to the left of the video player, making edits when needed.
    .
  5. Periodically click the “Save Draft” button near the top right corner of the editor dialogue until you are finished.
    .
  6. To export the edited caption file, click the “Options” ellipses (…) just to the right of the “EDIT AS TEXT” button, and just above the frame timing box and select “Download subtitles” from the listbox. The captions.sbv file will automatically download to your computer.

Convert Captions to .srt or .vtt Formats

Unlike YouTube, other video platforms like Vimeo and Kaltura use caption formats like .srt or .vtt. Converting caption files is easy with the Free Caption Format Converter Tool from 3Play Media, one of the most trusted captioning vendors in the market.

  1. Go to the 3Play Caption Format Converter.
    .
  2. Open the captions.sbv file you exported from YouTube in a plain text editor like Notepad or TextEdit.
    .
  3. Next, copy all of the text in the captions.sbv file.
    • Windows: Ctrl + A to select all, then Ctrl + C to copy.
    • Mac: command + A to select all, then command + C to copy.
      .
  4. Paste the copied text into the text box labeled “Paste Your SRT/SBV File.”
    • Windows: Ctrl + P to paste.
    • Mac: command + P to copy.
      .
  5. Select SRT or WebVTT as the Output Format, then click the “CONVERT MY FILE” button. The file will download to your computer.

Import the Converted Caption File to Vimeo

If you don’t already have one, follow Vimeo’s instructions to upload a video. I recommend setting it to private, at least until you’ve got everything edited.

  1. Start by going to your Vimeo Video Manager.
    .
  2. Click the video to which you’d like to add captions.
    .
  3. On the following video page, click the “Advanced” button in the right-hand sidebar.
    .
  4. On the video settings page, click the “Distribution” link in the left-hand navigation menu, then click the “Subtitles” link.
    .
  5. In the “Captions and Subtitles” heading, near the “My Uploads” heading, click theย  “New File” + button.
    .
  6. In the open menu, choose the language of your captions, then choose “Captions” in the “Type” field, then click the “Choose file” button.
    .
  7. Select the converted .srt or .vtt file from the files on your computer, then when the upload is complete, click to toggle the captions ON and click the “Save” button.
    .
  8. Return to your Vimeo video manger and click the video to view it in a video player. You should now see a CC button, which you can click to turn captions on.



Zoom Live Captions Are Here!

Just in time for the spring ’21 semester, Zoom has released live automatic speech recognition (ASR) captions for meetings and webinars! That means you no longer have to rely on workaround solutions like Google Slides or PowerPoint 365 as we previously recommended.

To start using live ASR captions in Zoom meetings and webinars, you’ll first need to go to the settings page of your Zoom account.

On the Settings page, select ‘In Meeting (Advanced)‘ in the menubar.

Find the setting labeled ‘Closed captioning‘ and make sure it’s toggled ON.

Next, select the checkbox labeled ‘Enable live transcription service to show transcript on the side panel in-meeting.’ Be sure to select the ‘Save‘ button after making the change.

Zoom live captions setting.

Note that any changes you make to your Zoom account won’t take effect until the next time you start a meeting or webinar. Any in-progress meetings need to be ended and restarted before the changes are available.

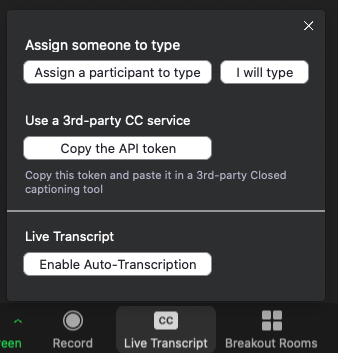
The next time you start a Zoom meeting or webinar you will see a button labeled ‘Live Transcript.’

Enable Auto-Transcription setting.

IMPORTANT: You must manually ‘Enable Auto-Transcription‘ each time you start a meeting to ensure that your meeting participants can use the closed captions.

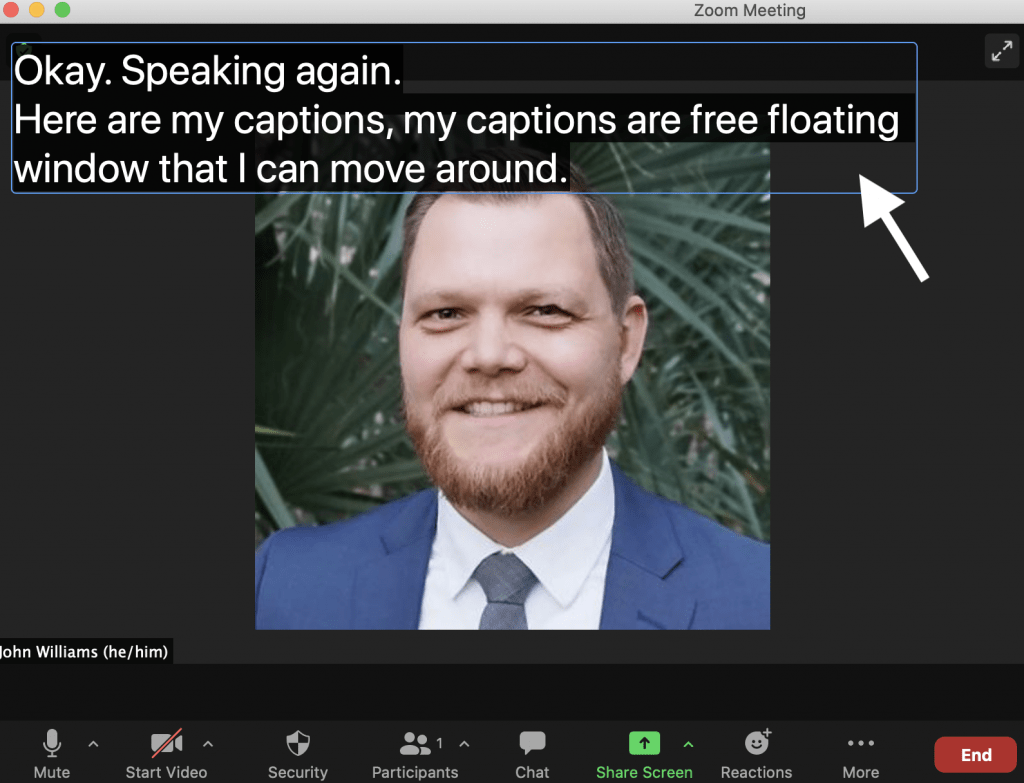
Once the host enables auto-transcription, each attendee can choose to show or hide the closed captions. Everyone can customize the size of caption text by selecting ‘Subtitle settings.’ Each attendee can also drag the caption box to reposition it anywhere in the meeting window.

Floating caption box is moveable.

Live captions are included in cloud recordings and are fully editable too. See our KB article about editing Zoom captions for more information.


October Accessibility Workshops & Events

It’s hard to believe it’s already October. It seems like only yesterday we were kicking off our inaugural accessibility workshops. Here we are, one year later, and we’ve got a new month of awesome workshops lined up for you.

Change can be difficult, but…

It would be an understatement to say A LOT has changed over the past year. One of the changes we’re most excited about is the new Digital Information Accessibility Policy (#851). We totally get it if you don’t share our enthusiasm at the phrase “new policy.” It probably just sounds like one more thing you have to do. But what if we told you that with just a little more attention to a few simple techniques, you can do your part to make Rice a more inclusive community for everyone. We think that’s worth getting excited about.

We’re gonna rock this!

One thing that hasn’t changed is that October is still National Disability Employment Awareness Month and October 10 is World Sight Day, so we’re in celebration mode. We can’t treat you to delicious pizza and salad this time around (thanks COVID ๐Ÿ™„ <eyeroll>). But, you can join us remotely at any of the workshops with your own slice ๐Ÿ• or anything else you want to eat or drink ๐Ÿน (we won’t tell ๐Ÿค).

Sign up here.

We hope to see you at one (or ALL) of these exciting workshops.

Intro to Digital Accessibility

This 1 hour workshop is designed to give you an overview of digital accessibility at Rice, including what the law says you must do, what Rice wants you to do, Rice’s standards for accessible digital information and online courses, “Low-hanging fruit” of digital accessibility, and more. Join us for one of the following sessions:

Click here to register for one of the following Intro sessions. On the following Zoom registration page, select your preferred date from the dropdown menu.

  • Monday, October 5, 3:00 p.m.
  • Monday, October 19, 3:00 p.m.
  • Monday, October 26, 10:00 a.m.

Design With WCAG

This 1 hour workshop is designed to give you a high-level overview of the WCAG 2.1, A-AA standards.
Learn about 8 basic techniques that you can apply widely to digital content. These techniques cover all A and AA criteria relevant to Rice content authors/administrators, including Headings, Forms, Tables, Alt Text, Using color, Readable text, Purposeful links, Closed captions and transcripts. Join us for one of the following sessions:

Click here to register for one of the following WCAG sessions. On the following Zoom registration page, select your preferred date from the dropdown menu.

  • Wednesday, October 7, 3:00 p.m.
  • Monday, October 12, 10:00 a.m.
  • Friday, October 23, 3:00 p.m.
  • Tuesday, October 27, 3:00 p.m.

Accessible Docs & PDFs

Learn the best practices for designing accessible Word documents and a workflow for converting them into accessible PDFs. Also learn techniques for remediating existing PDFs. Join us for one of the following sessions:

Click here to register for one of the following PDF sessions. On the following Zoom registration page, select your preferred date from the dropdown menu.

  • Friday, October 9, 3:00 p.m.
  • Friday, October 16, 10:00 a.m.
  • Wednesday, October 21, 3:00 p.m.
  • Wednesday, October 28, 10:00 a.m.

Better Captions & Transcripts

This 1-hour workshop is designed to give you an overview of options for live (synchronous) and recorded (asynchronous) closed captions using Zoom, Google Meet, and Kaltura, as well as other applications like PowerPoint 365 and Google Slides. Learn more about the best practices of using automatic speech recognition (ASR) captions and caption editing. Join us for one of the following sessions:

Click here to register for one of the following Caption sessions. On the following Zoom registration page, select your preferred date from the dropdown menu.

  • Wednesday, October 14, 10:00 a.m.
  • Thursday, October 29, 3:00 p.m.

What to Expect from Rice’s New Digital Accessibility Policy

We will discuss the details of Rice’s new Digital Information Accessibility Policy, 851. In this Q & A session, some topics include:

What “digital information accessibility” means. Who is responsible for accessible digital information at Rice. Priority areas where digital information should be made accessible ASAP. A timetable for remediating digital information. What to do if you receive an email and accessibility report from Public Affairs. Any other questions or clarifications you may have. Join us for one of the following sessions:

Click here to register for one of the morning Policy sessions. On the following Zoom registration page, select your preferred date from the dropdown menu.

  • Tuesday, October 27, 10:00 a.m.
  • Thursday, October 29, 10:00 a.m.
  • Friday, October 30, 10:00 a.m.

Click here to register for one of the afternoon Policy sessions. On the following Zoom registration page, select your preferred date from the dropdown menu.

  • Monday, October 26, 3:00 p.m.
  • Wednesday, October 28, 3:00 p.m.
  • Friday, October 30, 3:00 p.m.